
Data Validation in Excel – Shiksha Online
Data validation in Microsoft Excel is a feature that allows you to control what can be entered into a cell or range of cells. It helps ensure that data entered into your worksheet meets certain criteria, thus improving the accuracy and reliability of your data. Data validation can be applied to various types of data, including text, numbers, dates, and lists. The article explains the concept of data validation in Microsoft Excel and how to apply it in your spreadsheets.

When you create a common Exel sheet, particularly for customers, you may want to control information input to ensure data accuracy and consistency. You might need to –
- Restrict data entry to a certain date range
- Limit options with a list
- Ensure that only positive integers are entered
Data Validation is the method that controls user inputs into specific cells or a range as per the specified rules. This article will explain how to use data validation in Microsoft Excel.
Content
What is Data Validation in Excel?
Data validation in Excel is a tool that allows avoiding entering incorrect data or invalid data from the spreadsheet. This helps maintain the integrity of the information in our database.
Best-suited MS Excel courses for you
Learn MS Excel with these high-rated online courses

Importance of Data Validation In Excel
By default, the cells of the Excel sheet are ready to receive data. However, the calculations will depend on the data contained in the cells. It is crucial to ensure that the user enters the correct data type.

Here are just a few examples of what Excel’s data validation can do:
- Any value: No validation criteria applied
- Integer: Allows an integer between the minimum and maximum limits set
- Decimal: Allows a decimal or a percentage entered as a decimal between the established limits
- List: Allows a value from a list of options. A list arrow appears in the cell, and users choose from it
- Date: Allows a date within the prescribed limits
- Hour: Allow one hour within the prescribed limits
- Text Length: Allows text that contains certain numbers or characters
- Custom: Allows you to enter a formula to calculate what is allowed in the cell
How To Apply Data Validation
To apply data validation on a specific cell, go to-
Data => Data Tools => Data Validation command.
To apply the same validation criteria to a range of cells, select that range before executing the Data Validation. This will cause the same criteria to be applied to the entire set of cells.
You can work with many rows of data in Excel and select an entire column before creating the data validation criteria.
Create Data Validation In Excel
To analyze the data validation criteria in Excel, we can divide them into two groups based on their similar characteristics. The first group consists of the following criteria:
- Integer
- Decimal
- Date
- Time
- text length
These criteria are very similar because they share the same options to narrow the data, which are the following –
- Between
- Not Between
- Equal to
- Not equal to
- Greater than
- Less than
- Greater than or equal to
- Less than or equal to
For the options “between” and “is not between,” we must indicate a maximum value and a minimum value. However, we will display only one value for the other options.
For example, in the following image, you can see that cell C5 shows an error in the age calculation since the data in cell B5 does not correspond to a valid date.

- Go to Data Validation and check Allow.

- In the Allow list, click Date.
- In the Data list, click Less Than
- Enter the End Date

Now, when you click on the cell, you don’t get the previous error. Instead, you can edit your data as per the validation suggestions thrown by Excel.


Now try to add any date after 01/01/2010, you will get a warning message like the following –
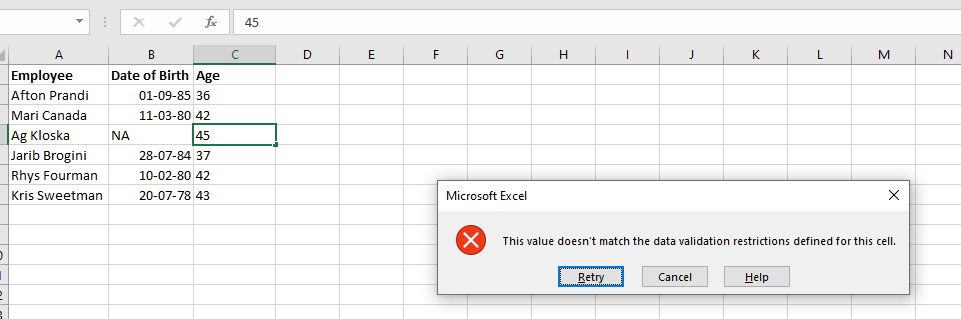
This type of error can be prevented if we use data validation in Excel by indicating that cell B5 will only accept valid dates.
Validation List With Data From Another Sheet
Many users use the validation list with data located on another sheet. Such tasks should be performed only if you have to create the appropriate reference to a said range.
To create a drop-down list with this Data, you must enter this reference when making the validation criteria.
1. Create the source value of the drop-down list in a different sheet

2. I will now go to a sheet where I need to create the external drop-down list. I will select a cell or range to place the drop-down list
4. Click Data > Data Validation.

5. Select List from Allow list. In Source, select the cells of source data

6. Click OK. External data validation is now created in the new sheet.

You can now select the country and use the spreadsheet as required.
How To Remove Data Validation
To remove the data validation criteria, follow the below steps –
- Select the cells with the drop-down
- Click Data >Data Validation.
- On the Settings tab, click Clear All.
- Click OK.

You will have removed any data validation applied to the selected cells by pressing the OK button.
Conclusion
I hope that you will have a better idea of how to use data validation with this guide. This functionality will significantly help control data entry by users. Furthermore, it will greatly reduce the chance of incorrect data being entered.
Top Trending Articles in MS Excel:
Most Useful Excel Formulas | Min Max Functions in Excel | Average Functions in Excel | Introduction to MS Excel | Financial Modelling in Excel | MS Excel interview questions | Sum Function in Excel | Trim Function in Excel | Pivot Table in Excel | Percentage in Excel | Vlookup in Excel | Median Function in Excel | Types of Charts in Excel | Count Function in Excel | MS Excel Vs. Google Sheet | Remove Duplicates in Excel | Create Graph in Excel
FAQs - Data Validation in Excel
What types of validation criteria can I set in Excel?
Excel allows you to set various types of validation criteria, including whole numbers, decimals, dates, times, text length, custom formulas, and list values from a range or drop-down list.
Can I create drop-down lists using data validation?
One of the most common uses of data validation is to create drop-down lists. You can specify a list of valid options, and Excel will display a drop-down arrow in the cell, allowing users to select from the predefined list.
How can I set up an input message to guide users?
When setting up data validation, you can include an input message that appears when the user selects the validated cell. This message can provide instructions or guidance on what type of data is expected.
What happens if a user tries to enter invalid data?
Excel can display an error alert if a user tries to enter data that violates the validation criteria. You can customize this alert to inform the user about the error and provide instructions on correcting it.
Can I copy data validation settings to other cells?
Yes, you can copy data validation settings from one cell to another using Excel's copy-and-paste functionality. Copy and paste the cell with data validation settings onto the desired cells.

Rashmi Karan is a writer and editor with more than 15 years of exp., focusing on educational content. Her expertise is IT & Software domain. She also creates articles on trending tech like data science,