
Learn how to use Django Models
 Call 8585951111
Django models are a unique and key feature in Django that helps us create database tables, fields, and constraints using ORMs(Object-relational Mappers). The goal of models is to have a pythonic object representation for each element in the database so that developers can avoid writing manual SQL queries for all database operations.

All Django models inherit their properties from django.db.models.Model. The database fields are represented using the attributes of the Models. Moreover, it servers the developer with APIs to perform CRUD operations on the database.
For example, consider the below model:
# import the standard Django Model
# from built-in library
from django.db import models

# A simple model that inherits
# from models.Model
class MyModel(models.Model):

        # Attribute name is a character field
        # that can hold a max of 100 characters
        name = models.CharField(max_length =100)

        # Attribute EID holds integers
        # without any length restriction
        EID = models.IntegerField()
If this is to be mapped to the database, the database table will look like below:
| Model MyModel | Table myapp_mymodel | |
| N/A | ID | 1 |
| Name | name | Raju kumar |
| EID | employee_id | 12354 |
Now let’s jump to the main part.
Working with Django Models:
To work with Django models we need to have a Django project and an app running within it. To learn about creating a project refer to this article – Getting Started with Django. To learn about creating an app within a Django project refer to this article – Views in Django Using Python.

At this point, we have a project named sample_project and an app named sample_app as shown below:

Creating a Model:
Now inside the sample_app directory, there is a models.py file as shown below:

Open up the models.py file and add in the below code:
# import the standard Django Model
# from built-in library
from django.db import models

# Creating a new model class
# named "MyModel"
class MyModel(models.Model):

        # fields of the model
        title = models.CharField(max_length = 200)
        summary = models.TextField()
        release_date = models.DateTimeField()
        img = models.ImageField(upload_to = "images/")

        # renames the instances of the model
        # with their title name
        def __str__(self):
                return self.title
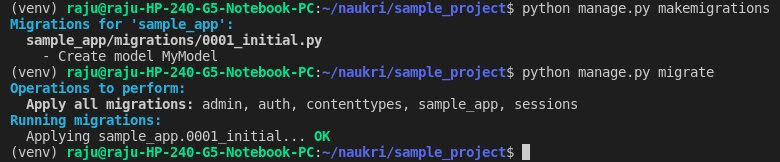
Now, it is important to note that every time you make changes to the models of a Django project, we need to create migrations (ie, migrations create SQL commands respective to the models) and further migrate the migrations that we created to reflect the changes in the database.
To create migrations use the below command:
python manage.py makemigrations
To create tables in the database from the migrations use the below command:
python manage.py migrate
Your terminal at this point will look like below:
At this point our model is ready. Note that as we have not configured any database for our project, it will establish connections with the sqlite3 database that comes inbuilt with Django.
Now we can perform CRUD (Create, Read, Update & Delete) operations in our database. Basically, we can create a database instance for our model, delete or modify the same instance.
Rendering Models in Django:
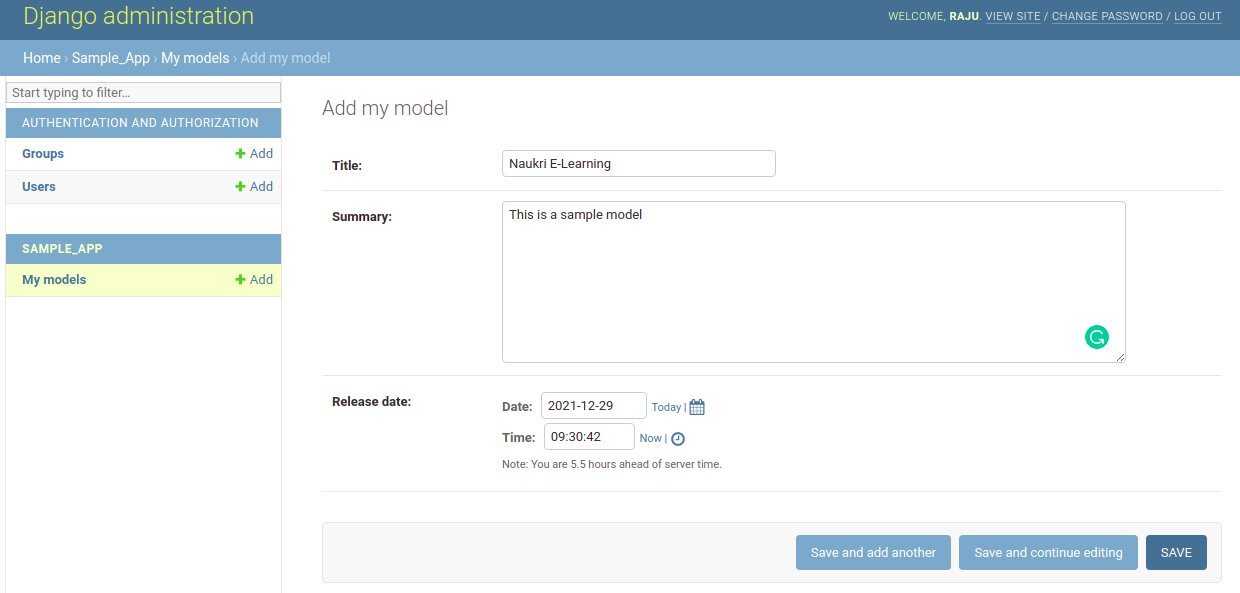
Now we need to specify to the admin of the project that we have introduced a new model (ie, MyModel) to our database. For that, we need to open up the sample_app/admin.py file and add the below code:
from django.contrib import admin

# Register your models here.
from .models import MyModel

admin.site.register(MyModel)
The above code imports the corresponding model from models.py and registers it with the admin interface. Now if we visit our admin interface, we can see that we have My Models in it and we can add elements to our model as shown below:
Using Django Shell:
The Django shell can be used to interact with its database models for adding, deleting, modifying, and querying objects, using the database-abstraction API called ORM(Object Relational Mapper). To access the Django ORM we can use the below command inside our project directory:
python manage.py shell
Now let’s take a look at the CRUD operations that can be performed using the Django shell.
1. Add items to the database:
To add an item to our model(ie, MyModel) we can use the below command:
>>a = MyModel(title = "Naukri",summary = "This is summary",release_date = "2021-12-29")
The save the item in the database using the below command:
a.save()
Now if you check our model(ie, MyModel) in the admin panel, we will see that the item has been added:

2. Retrieving items from Models:
We just added the “Naukri” item in our model(ie, MyModel) and to retrieve the item we can use the below command in the Django shell:
MyModel.objects.all()
This will return the object as:
<QuerySet [<MyModel: Naukri>]>
Take a look at the below image for reference:

3. Updating existing item:
Now let’s say we want to modify the item that we added to the database(ie, Naukri). Let’s for the sake of simplicity update the title of the object from “Naukri ” to “Naukri.com”. Note at this point we only have 1 object in our database therefore it will have a Django assigned id of 1. So to update the same object, we can make use of the following command in the Django shell:
modified_object = MyModel.objects.get(id=1)
modified_object.title = "Naukri.com"
modified_object.save()
Now let’s check if the object has been modified using the below command in the shell:
MyModel.object.all()
This will give us the following output:
<QuerySet [<MyModel: Naukri.com>]>
As we can see the object title has been changed from “Naukri” to “Naukri.com”. Take a look at the below image for reference:

4. Deleting items:
As we have only one object in our database, let’s delete it using the below command in the Django shell:
deleted_object = MyModel.objects.get(id=1)
deleted_object.delete()
Now that we have deleted the item from our database, let’s verify the same using the below command:
MyModel.objects.get(id=1)
The above query throws an error as the item doesn’t exist anymore. Take a look at the below image for reference:

Best-suited Backend Development courses for you
Learn Backend Development with these high-rated online courses

Field Validation in Django Models:
Most Django Model fields have in-built field validators. For instance, the CharField in Django models has an inbuilt validator that makes sure only strings are accepted by the CharField.
In our model (ie, MyModel), we have a release_date attribute that only accepts a date as it’s a DateTimeField. Let’s see what happens when we try to feed it a string instead of a date. Take a look at the below image:
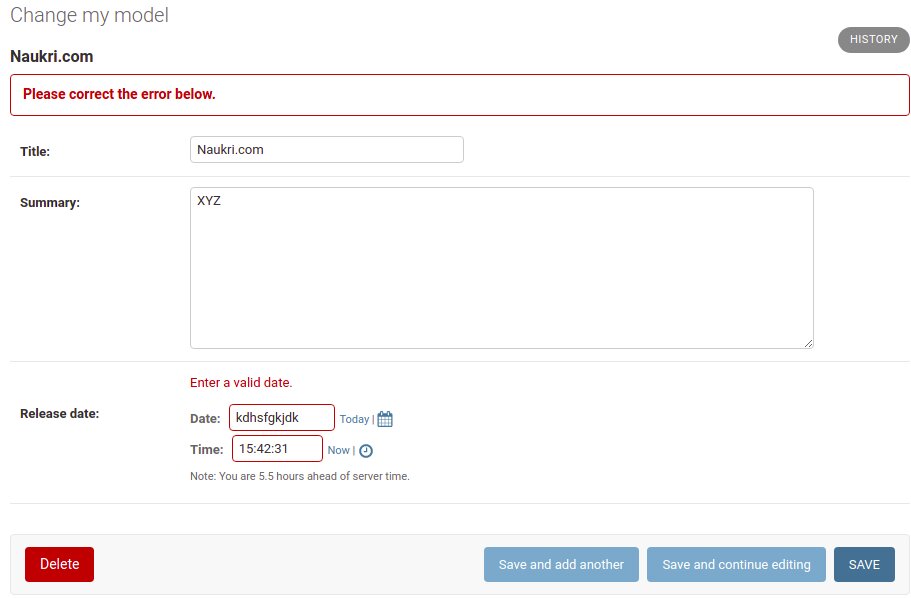
As we can see in the above image, the Date field throws an error asking us to add a valid date. This is one simple example of how fields in a Django model are validated.
Conclusion
In this article, we covered the following concepts of Django Models:
- What is a Model in Django?
- Working of Models in Django
- Creating Models in Django
- Performing CRUD operations in Django Models
- Concept of Field Validators in Django
Explore More:
- Why Learn Python? Reasons and Top Resources to Learn Python
- Top Django Interview Questions and Answers
If you have recently completed a professional course/certification, click here to submit a review.
