
Mail Merge in Excel – Shiksha Online
Mail Merge in Excel is an essential tool for creating a set of documents, such as campaigns, surveys, forms, letters, etc., to be sent to many clients. Each card or label contains the same type of information, although its content is unique. For example, in the letters you send to your clients, each can be personalized with the name of the person to whom it is addressed. The unique information for each card or label comes from the entries contained in a data source. Read the blog to learn more about mail merge.

Content
Overview of Mail Merge in Excel
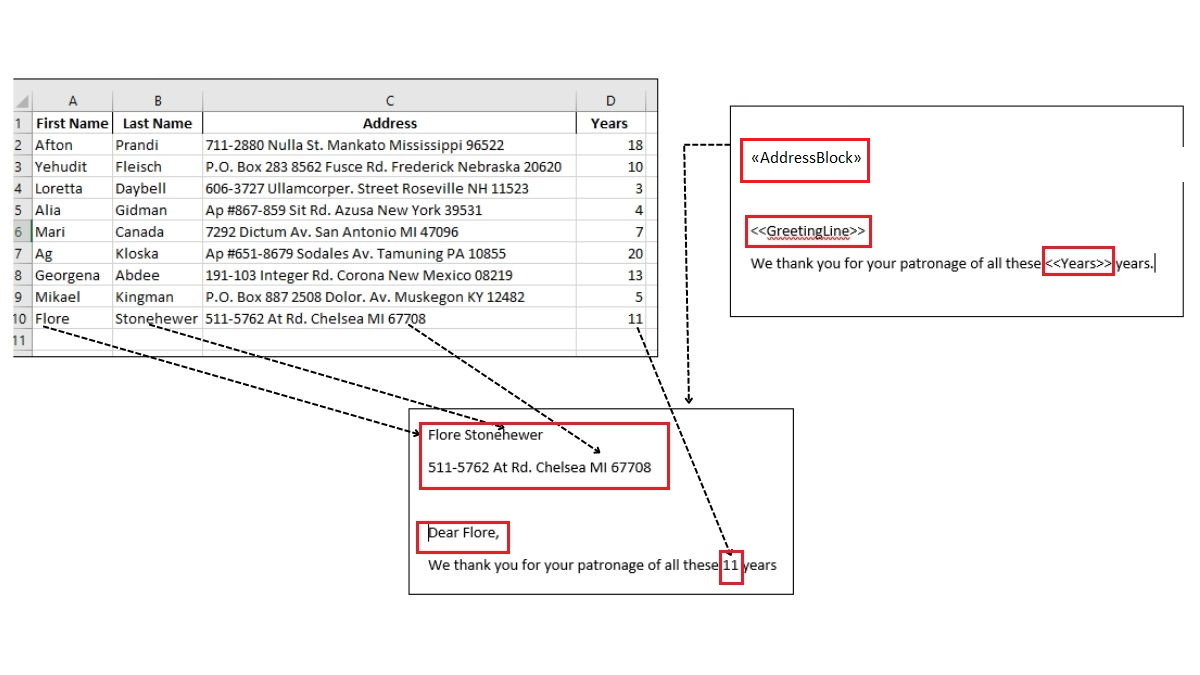
Before moving on to the Mail Merge process, look at the screenshot below. This is how Mail Merge works.
You have data from an Excel spreadsheet and a template from a Word doc. The Mail Merge option uses data from Excel and embeds it in the Word template.
Let us see how it works in detail.

 Read Later

Best-suited MS Excel courses for you
Learn MS Excel with these high-rated online courses

Create Your Excel Spreadsheet
The primary step is to set up and prepare the data in the Excel spreadsheet as the data source for the recipient list. When preparing your Excel spreadsheet for a Mail Merge, you need to ensure the following conditions –
- Column names match the fields you need to insert in your Mail Merge. For example – separate columns for the first and last names if you must address readers by their first name.
- All the data is present in the first sheet of your spreadsheet.
- Entries with data like percentages, currencies, and postal codes are in the correct format.
- You have stored the spreadsheet for the Mail Merge on your local system.
- You have made all the necessary changes to your spreadsheet before it’s connected to your Mail Merge document in Word.
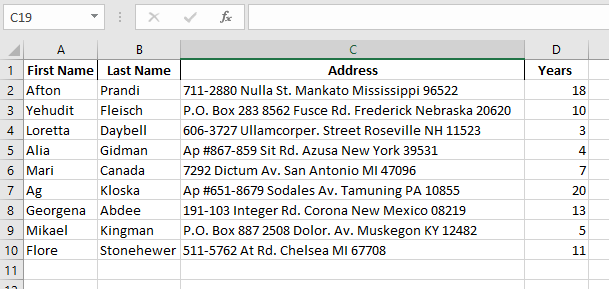
We have the below data set that needs to be merged for sending letters.
In our example, we will merge letters. The steps are the same for email messages as well.
Create a Word document. Create your letter content and create a new Word doc.

Select the merge option – Go to Mailings ⇒ Start Mail Merge ⇒ Letters.

You can now attach your Excel file with the Word doc. Browse and locate your Excel file and click Open.

You will be prompted to choose the sheet of your choice. Select that and click OK.

You have now established a connection between Excel and Word. This Excel sheet is the source of your letter content. Whenever you change your Excel spreadsheet, the Mail Merge data source will be automatically updated.
Now check your recipient list, and deselect names if you don’t wish to send letters or emails to them. Continue if all is well.

You will get a dialogue box that suggests specific address elements; choose the one that is suitable for your business and click OK.

Match Fields
You have the details that you need to send the letters. If you wish to add more details, click the “Match Fields” option. You will be redirected to another window and can add the missing details per the requirements.

Coming back to the previous option. Keep the letter content handy and copy-paste/write the text on the Word doc. Now add the required placeholders. This includes Address Block and Greeting Line. These placeholders will help to understand where the data should be placed.


Now that your letter content is ready, insert the merge field. This will help to personalize your letter further. In our example, we will mention the count of years for which the consumer has been associated with the organization.


You can preview your content with the help of Preview Results. Verify if all information is placed correctly.

If you think that the mailer content is good to go, go to Finish & Merge and select the options, which are –
- Edit Individual Documents
- Print Documents
- Send Email Messages

Save this Word doc somewhere for your future reference. After you save the doc, it will remain in your mailer list. You just need to open it and click Yes when prompted. This will help you retain the connection we established between Excel and Word.


Using Step-by-Step Mail Merge Wizard
You can also access the Mail Merge features from the Mail Merge Wizard located –
Mailings ⇒ Start Mail Merge ⇒ Step-by-Step Mail Merge Wizard

When you click on the Step by Step Mail Merge Wizard button, a Mail Merge pane will open at the extreme right of your document. You will notice that it guides you through the process of Mail Merge, step-wise.

It is easier to work with the Mailings option located on the toolbar since all the options related to the Mail Merge process are located up front.
Tips to Efficiently Use Excel for Mail Merge
Here are some simple tips to prepare your Excel spreadsheet for a mail merge:
- Match column names with mail merge fields – Ensure that the column names in Excel match the information you want to insert in your document. For example, if you want to use a person's first name, create separate columns for "First Name" and "Last Name."
- Use the first sheet – Keep all the data you want to merge in the first sheet of your Excel file.
- Format numbers correctly – Ensure percentages, currency values, and postal codes are formatted properly so Word can read them correctly.
- Save the file on your computer – The Excel file should be stored on your local device (not in an online location) to avoid errors.
- Complete all changes before connecting – All edits and updates should be done before linking the spreadsheet to your mail merge document in Word.
Conclusion
Using Mail Merge is a highly efficient tool that saves a lot of time. The most interesting thing about Mail Merge is that it creates the same letter several times, taking into account the variables that are assigned. If we have to make a letter for 20 people with their names and IDs, Word will take the information from Excel and create a letter for each name and address.
I hope you find this feature interesting and that we helped you to understand how Mail Merge works.
Keep learning!
Top Trending Articles in MS Excel:
Most Useful Excel Formulas | Min Max Functions in Excel | Average Functions in Excel | Introduction to MS Excel | Financial Modelling in Excel | MS Excel interview questions | Sum Function in Excel | Trim Function in Excel | Pivot Table in Excel | Percentage in Excel | Vlookup in Excel | Median Function in Excel | Types of Charts in Excel | Count Function in Excel | MS Excel Vs. Google Sheet | Remove Duplicates in Excel | Create Graph in Excel
FAQs - Mail Merge in Excel
What types of documents can I create with Mail Merge in Excel?
You can create various types of documents in Excel using Mail Merge.
- Letters
- Envelopes
- Labels
- Name Badges
- Directories
- Certificates
- Invoices
- Reports
- Invitations
- Surveys or Questionnaires
- Thank You Cards
- Sales Proposals
- Catalogues or Brochures
What are the common errors in Mail Merge, and how can I fix them?
Common errors in Mail Merge include missing data, formatting issues, and field mismatches. To fix them, ensure your Excel data is correctly formatted and matches the merge fields in your Word document.
Do I need to save my Excel spreadsheet before starting a Mail Merge?
It's a good practice to save your Excel spreadsheet before starting a Mail Merge, especially if you plan to change the data in Word. This ensures you don't accidentally overwrite your original data.
Can I use Mail Merge for mass mailing and printing labels for an extensive contact list?
Yes, Mail Merge is commonly used for mass mailing and printing labels for an extensive contact list. You can customize each label or letter with recipient-specific information from your Excel spreadsheet.
What is the advantage of using Mail Merge in Excel over manually creating individual documents?
The main advantage of using Mail Merge in Excel is efficiency. It saves time and reduces the risk of errors when creating personalized documents for many recipients, compared to manually creating each document individually.

Rashmi Karan is a writer and editor with more than 15 years of exp., focusing on educational content. Her expertise is IT & Software domain. She also creates articles on trending tech like data science,